


Hello!!! 👋👋👋
Yesterday I was working on an old project and realized that every time I finished a task and wanted to see it in development or production, I had to do multiple steps.
What?
That's where Continuous Deployment comes in. It's an automated process where the code goes through some steps and gets deployed into production.
It is great because once we set up the process, we can focus on our code and forget about getting out there. Let's go to my example so you can set up yours along the way.
How?
In Github, let's go to the repository we want to implement our CD solution and go to "Actions" in the top bar.

Then click in "New workflow". It will greet us with a page where we can set up ours by scratch or we can choose a template for any language.
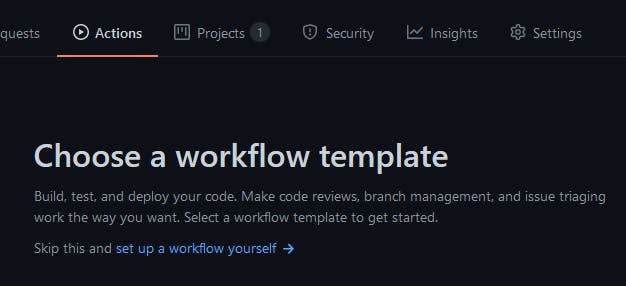
Here click on "set up a workflow yourself" because that's what big boys do. Now GitHub will open an editor for our first workflow. On the right, we will find the action's marketplace. Actions are processes made by the community. You can use them to check code quality, scan for leaked secrets, run tests (I just discovered you can run Google's Lighthouse as a Github action 🤯), optimize images, and many more.
A workflow starts with an event and triggers jobs. Each job has steps that control what actions it takes. Actions are commands that we set manually or take from the marketplace. Let's create a workflow that builds our Angular application and deploys it to Firebase.
First, let's set its name and the event that will trigger this workflow:
name: Build and Deploy to Firebase
'on':
    push:
        branches:
              main
This means that the workflow will trigger each time we push code into the main branch.
jobs:
    build_and_deploy:
        runs-on: ubuntu-latest
This means that there is a job called "build_and_deploy" and it will run in a clean VM with the latest version of Ubuntu.
steps:
      - uses: actions/checkout@v2
      - name: Install Node
        uses: actions/setup-node@v2.3.0
        with:
          version: 14.17.1
      - name: Install Angular Cli
        run: npm install -g @angular/cli@12.1.3
      - name: Install Angular dependencies
        working-directory: ./frontend
        run: npm install
      - name: Build Angular App
        working-directory: ./frontend
        run: npm run build
      - uses: FirebaseExtended/action-hosting-deploy@v0
        with:
          repoToken: '${{ secrets.GITHUB_TOKEN }}'
          firebaseServiceAccount: '${{ secrets.FIREBASE_SERVICE_ACCOUNT_MYPROJECT }}'
          channelId: live
          projectId: myProject
These are the steps that will run in this workflow. Let's review each step and what it does.
- uses: actions/checkout@v2
This step simply checkouts our code into the VM where our workflow is running.
      - name: Install Node
         uses: actions/setup-node@v2.3.0
         with:
         version: 14.17.1
Here we install NodeJS (it's pretty self-explanatory)
      - name: Install Angular CLI
        run: npm install -g @angular/cli@12.1.3
Here we install Angular CLI to compile our code. I like to set the version (@12.1.3) because it's more predictable. In my opinion, is very important to avoid leaving things to chance when it's a process we want to run unsupervised.
      - name: Install Angular dependencies
        working-directory: ./frontend
        run: npm install
Here we install Angular's dependencies. There is a new parameter here that took me quite some time to find. Some commands need to run in specific directories, that's where working-directory comes in handy. Here we are saying to run the command in the frontend folder.
      - name: Build Angular App
        working-directory: ./frontend
        run: npm run build
Here we just build the app.
      - uses: FirebaseExtended/action-hosting-deploy@v0
        with:
          repoToken: '${{ secrets.GITHUB_TOKEN }}'
          firebaseServiceAccount: '${{ secrets.FIREBASE_SERVICE_ACCOUNT_MYPROJECT }}'
          channelId: live
          projectId: myProject
Here we use a community action to deploy our hosting code to Firebase. There you can see there are some variables used with ${{ }}. This is very important because our workflow file will be in the repository and we don't want our API keys to be exposed. So we can save them in the repository settings under secrets (let me know if you want an article related to this).
Then, just commit the file and the workflow is ready to go.
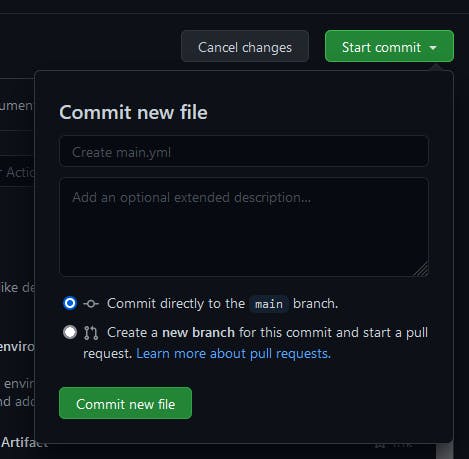
Try to push any change to your Angular App and see it deployed.
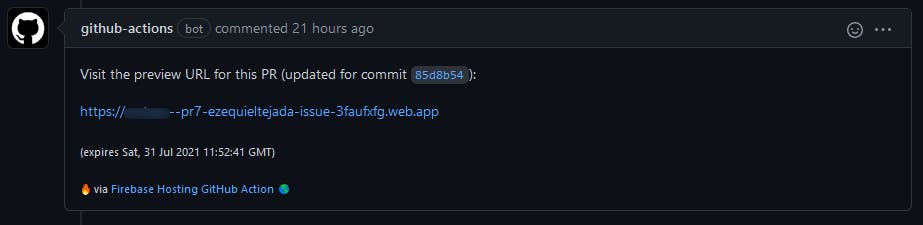
If you are a good boi and use pull requests, you may also see a message from the workflow saying your deployment is done.
This is just the tip of the iceberg, there is much more to discover, and have a lean but powerful process to keep the code deploying 🚀. If you combine this with all the tools you can find in the Github Marketplace the sky is the limit. Also, if you want to tinker around please have the documentation alongside you.
As always, I hope you can take anything useful from this and I'd like to know your thoughts.